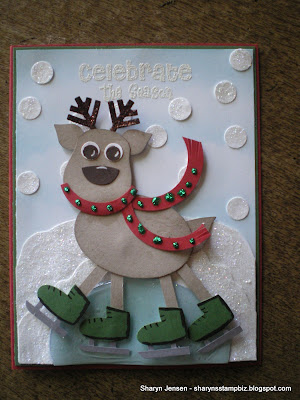
I started with a base card of Riding Hood Red cut at 5 1/2" x 8 1/2", scored at 4 1/4". I then added a layer of Garden Green using my runner adhesive. It is cut to be 4 1/8" x 5 3/8". For the top layer, I took a piece of Whisper White and used my chalks to color the sky in. once that was finished I attached it to the card with runner adhesive. I then added a couple of pieces of Whisper White I cut to be kind of rounded as my mounds of snow using the same adhesive. I added Dazzling Diamond glitter to them with my glue pen. To complete the snow, I wanted to have it snowing so I added snowballs punched from Whisper White with glitter added on it. I used the circle from the itty bitty punch pack for these.
For my greeting, I decided to have it blend with the background. This stamp came with a set I bought at my craft store just down the street. I stamped it directly onto the card stock using VersaMark ink. I then heat embosses it using a white embossing powder that I added some Dazzling Diamond glitter too. I liked that it had the snowy look which fit in with the theme on the card.
I first saw a reindeer that resembled this guy on Ellen Kemper's blog. However, I did change mine from hers so I will share with you how I made him. The colors I used for him are Crumb Cake, Early Espresso, Riding Hood Red, Whisper White, Garden Green and Brushed Silver. The antlers were made using the retired snowflake punch. I miss this punch very much. It worked so well for so many things. I added a brown Stickles glitter glue to these. The head is the owl body from the owl builder punch with the feet and ears cut off. All of the Crumb Cake pieces were edged using Crumb Cake ink just to give them some depth. For the ears, I used an ornament punch from the Merry Minis punch pack available in the holiday mini catalog. The eyes are from 2 punches: the circle from the itty bitty punch pack was used for the white and the medium circles from the owl builder punch are used for the brown. For the nose, I used a retired punch called the stocking builder. The toe of the stocking worked perfectly. The neck of the scarf is a 1 3/8" circle punched just off of a 1 3/8" circle hole. The long pieces of the scarf are more of the same circle pieces. All you need is one hole and you can punch offset as many times as you need. I added green Stickles glitter glue dots to this. The body is a wide oval. For the tail, I turned to my bird builder punch and used the bird's wing. The legs are word windows that were punched along the edge of a piece of card stock. I only inserted the card stock half way into the punch lengthwise to make these. The ice skates were really easy to make. They use another retired punch. This time it was the Heart to Heart punch. I punched out 4 of the wide hearts and trimmed off one side to make the boot. I added black marker to define the boot and laces. The blade is a word window punched the same way as the legs. You only need half of each window for the blade so you will punch 2 to make all 4. For the connecting piece of the blade to the boot, you can just use scraps of card stock. I used the retired horizontal slot punch and punched it like the word window so the pieces would be thin enough. All pieces were attached using a liquid glue and the finish skating reindeer was attached using dimensionals.
The last piece of the card is the ice. I took a piece of Bashful Blue and cut it using the big shot and the retired ovals die. I used the largest oval and trimmed off any overhang. I attached it to the snow using a liquid glue. I then added Crystal Effects to the top of it to give it the glossy look. I really like how it turned out.
Well everyone we have once again reached the end of another week. I wish you all a wonderful weekend. I shall return on Monday with another card for you to see. Thanks for stopping by today.


No comments:
Post a Comment